#1에서 스프링 개발 환경을 셋팅하고
#2에서는 DB연결을 설정했고
[spring] IntelliJ 스프링 #2 DB.연결(mariaDB) (tistory.com)
[spring] IntelliJ 스프링 #2 DB.연결(mariaDB)
[spring] IntelliJ 스프링(maven) #1 개발환경 만들기 (tistory.com) [spring] IntelliJ 스프링(maven) #1 개발환경 만들기 IntelliJ에서 maven 스프링 프레임워크 개발 환경 셋팅 IDEA는 2023.2.1 버전으로 진행하였습니다.
awesomefrog.tistory.com
#3에서는 mybatis mapper 설정을 해보겠습니다.
우선은 DB에 테이블을 만들고 데이터를 넣어줍니다.~
drop table `tb_test`;
CREATE TABLE `tb_test` (
`seq` int(11) NOT NULL AUTO_INCREMENT,
`title` varchar(100) DEFAULT NULL,
`writer` varchar(30) DEFAULT NULL,
`wdate` datetime DEFAULT NULL,
PRIMARY KEY (`seq`)
) ENGINE=InnoDB AUTO_INCREMENT=4 DEFAULT CHARSET=utf8mb3 COLLATE=utf8mb3_general_ci;
select * from tb_test tt ;
INSERT INTO test.tb_test
(title, writer, wdate)
VALUES('안녕하세요','홍길동', now());
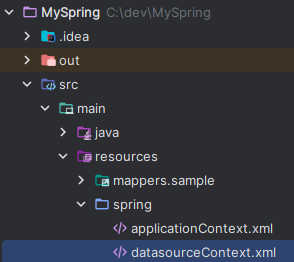
1. datasourceContext.xml
해당경로 datasourceContext.xml에서 매퍼 xml 경로를 설정 해줍니다.
<?xml version="1.0" encoding="UTF-8"?>
<beans xmlns="http://www.springframework.org/schema/beans"
xmlns:xsi="http://www.w3.org/2001/XMLSchema-instance"
xmlns:mybatis-spring="http://mybatis.org/schema/mybatis-spring"
xsi:schemaLocation="http://www.springframework.org/schema/beans http://www.springframework.org/schema/beans/spring-beans.xsd
http://mybatis.org/schema/mybatis-spring http://mybatis.org/schema/mybatis-spring.xsd">
<bean id="dataSource" class="org.springframework.jdbc.datasource.DriverManagerDataSource">
<property name="driverClassName" value="com.mysql.cj.jdbc.Driver"/>
<property name="url" value="jdbc:mysql://localhost:3306/test?useSSL=false&serverTimezone=UTC"/>
<property name="username" value="root"/>
<property name="password" value="root1234"/>
</bean>
<bean id="SqlSessionFactory" class="org.mybatis.spring.SqlSessionFactoryBean">
<property name="dataSource" ref="dataSource"/>
<!--추가-->
<property name="mapperLocations" value="classpath:mappers/**/*Mapper.xml"/>
</bean>
<!-- 추가-->
<mybatis-spring:scan base-package="com.test.sample"/>
<!-- //추가-->
<bean id="sqlSession" class="org.mybatis.spring.SqlSessionTemplate" destroy-method="clearCache">
<constructor-arg name="sqlSessionFactory" ref="SqlSessionFactory"/>
</bean>
</beans>
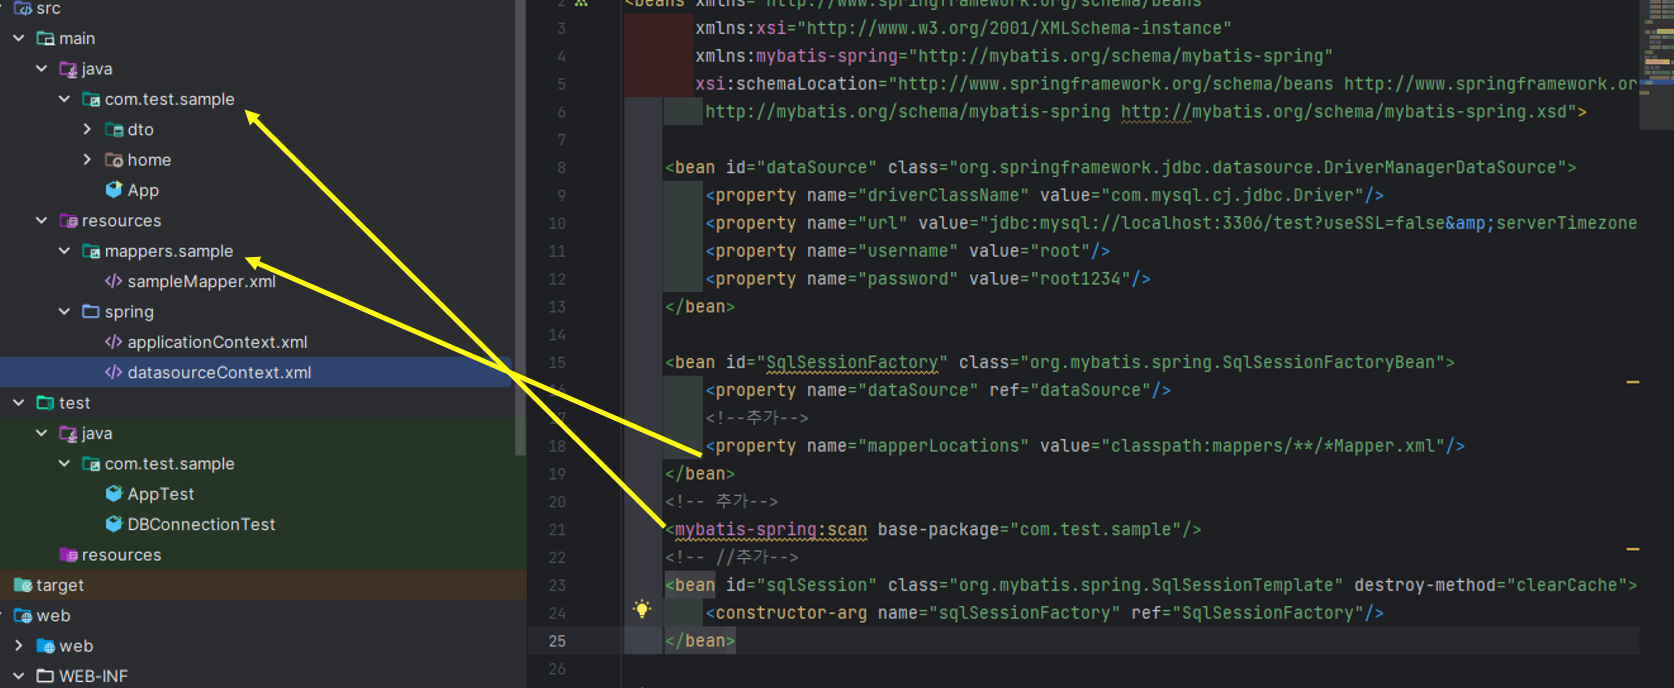
소스에 2가지가 추가가 되었는데, sql문이 있는 xml 은 resources/mappers/sample/*Mapper.xml 이 파일들을 참조하겠다라는 것이고,
자바단 Mapper를 스캔하려면 com.test.sample패키지를 확인하라는 뜻으로 이해하면 된다.
2. sampleMapper.xml 파일 만들기
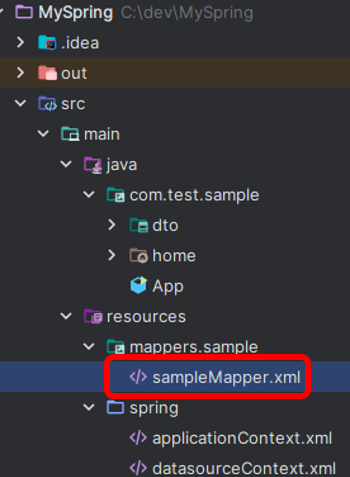
그림과 같은 경로에 sampleMapper.xml을 만들어준다. (mapper/sample/sampleMapper.xml)
아래 소스를 복사하여 붙여넣는다.
<?xml version="1.0" encoding="UTF-8"?>
<!DOCTYPE mapper PUBLIC "-//mybatis.org//DTD Mapper 3.0//EN"
        "http://mybatis.org/dtd/mybatis-3-mapper.dtd">

<mapper namespace="com.test.sample.home.service.impl.TestMapper">
    <select id="selectTestSample"  resultType="com.test.sample.dto.Test">
        select * from tb_test
    </select>

</mapper>
해당 파일에 insert , update 등 사용할 쿼리를 아래와 같은 구조로 만든다.
resultType은 해당 경로의 Class를 참조한다는 것이다.
<select id="selectTestSample"  resultType="com.test.sample.dto.Test">
    select * from tb_test
</select>
3. Mapper, Service, ServiceImpl 만들어 객체 불러오기
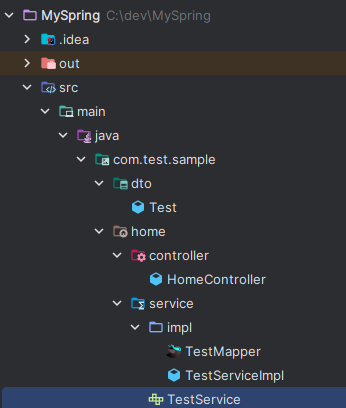
다음은 위와같은 구조로 패키지를 만들고 클래스를 만들어볼것이다.
TestMapper, TestService, TestServiceImpl 파일들을 만들어 볼텐데 순서대로 진행해 보자.
패키지 com.test.sample.home.service.impl에 TestMapper 인터페이스를 만들어준다.
com.test.sample.home.service.impl
//TestMapper.java
package com.test.sample.home.service.impl;

import com.test.sample.dto.Test;
import org.apache.ibatis.annotations.Mapper;
import org.springframework.stereotype.Repository;

@Repository
@Mapper
public interface TestMapper {


    public Test selectTestSample(Test test);
}
com.test.sample.home.service
TestService.java
//TestService.java
package com.test.sample.home.service;

import com.test.sample.dto.Test;

public interface TestService {

    public Test getTest(Test test);

}
com.test.sample.home.service.impl
//TestServiceImpl
package com.test.sample.home.service.impl;

import com.test.sample.dto.Test;
import com.test.sample.home.service.TestService;
import org.springframework.beans.factory.annotation.Autowired;
import org.springframework.stereotype.Service;
import org.springframework.transaction.annotation.Transactional;

@Service
public class TestServiceImpl implements TestService {

    @Autowired
    TestMapper mapper;

    @Override
    public Test getTest(Test test) {
        return mapper.selectTestSample(test);
    }
}
컨트롤러 단에 만들어놓은 서비스를 불러줍니다.
//HomeController.java
package com.test.sample.home.controller;

import com.test.sample.dto.Test;
import com.test.sample.home.service.TestService;
import com.test.sample.home.service.impl.TestServiceImpl;
import lombok.extern.slf4j.Slf4j;
import org.springframework.beans.factory.annotation.Autowired;
import org.springframework.stereotype.Controller;
import org.springframework.ui.Model;
import org.springframework.web.bind.annotation.GetMapping;


@Controller
public class HomeController {

    @Autowired
    TestServiceImpl testService;

    @GetMapping("/")
    public String home(Model model){


        Test test = new Test();
        test = testService.getTest(test);

        model.addAttribute("list",test);
        return "home/index";
    }
}
그리고 index.jsp 파일도 수정해줍니다.
<%--
  Created by IntelliJ IDEA.
  User: Lenovo
  Date: 2023-10-10
  Time: 오후 2:15
  To change this template use File | Settings | File Templates.
--%>
<%@ page language="java" contentType="text/html; charset=UTF-8"
         pageEncoding="UTF-8"%>
<%@ taglib prefix="c" uri="http://java.sun.com/jsp/jstl/core"%>
<html>
<head>
    <title>Title</title>
</head>
<body>
<table>
    <thead>
    <tr>
        <th>제목</th>
        <th>작성자</th>
        <th>작성일</th>
    </tr>
    </thead>
    <tbody>
        <tr>
            <td>${list.title}</td>
            <td>${list.writer}</td>
            <td>${list.wdate}</td>

        </tr>
    </tbody>
</table>
</body>
</html>
그리고 톰켓을 실행하기전에 pom.xml에 아래 소스를 넣어 리로드 해주고 톰캣을 실행 해줍니다.<dependency>
<groupId>javax.servlet</groupId>
<artifactId>jstl</artifactId>
<version>1.2</version>
</dependency>
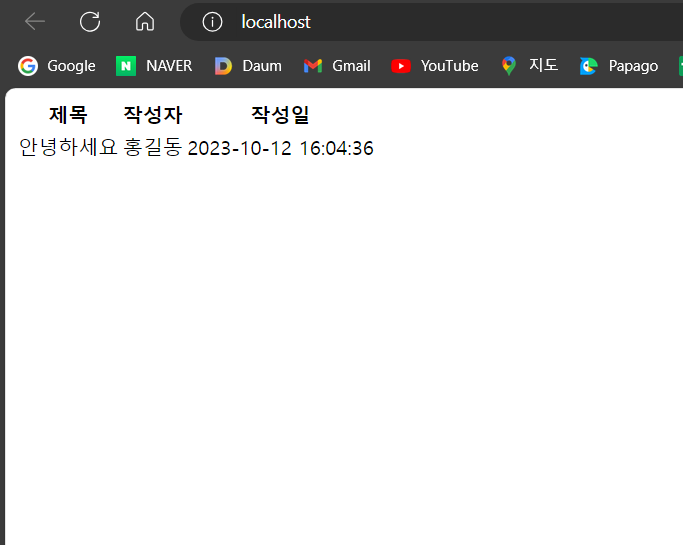
다음과 같이 나오면 성공스!~!
'프레임워크 > 스프링' 카테고리의 다른 글
| [스프링부트] AtomicBoolean 스케줄된 작업을 조건부로 실행하는 방법 (2) | 2024.02.15 |
|---|---|
| [에러]Unable to create a Configuration, because no Bean Validation provider could be found. Add a provider like Hibernate Validator (RI) to your classpath. (4) | 2023.12.22 |
| [spring] IntelliJ 스프링 #2 DB.연결(mariaDB) (6) | 2023.10.12 |
| [spring] IntelliJ 스프링(maven) #1 개발환경 만들기 (6) | 2023.10.11 |
| Static Resources 매핑 안 (0) | 2023.06.13 |


댓글